Ceshihao

Ceshihao's Blog


  • Home

  • About

  • Tags

  • Archives

Docker容器中JVM资源限制

Posted on 2021-11-23 |

问题背景

众所周知,Docker 容器时利用 CGroup 对进程使用的资源进行限制的。
而旧版本的JVM(低于 8u131)与top/free等系统命令有类似的问题,并不会自动识别CGroup的资源限制。这将导致JVM读取和分配的是整台机器的资源,一旦进程使用的资源超过容器的限制就会被Docker杀死,造成Java应用OOM。
很明显,Java社区很快也意识到了这个问题,在后续的版本里进行了支持。

8u131版本

从 8u131 版本开始支持 UseCGroupMemoryLimitForHeap 和 MaxRAMFraction 这两个选项,用 CGroup 中限制的内存资源来作为分配的依据。选项默认是不开启的,需要开启 UnlockExperimentalVMOptions 才能使用。

下面通过 Docker 对容器内的 JVM 限制 100MB 的内存,对比是否开启选项的效果。

未开启UseCGroupMemoryLimitForHeap

可以看到 JVM 并未感知到 Docker(Cgroup) 对内存的限制,仍然为JVM Max. Heap Size 分配 (443.00MB) 超过资源限制。

1
2
3
4
5
6
7
8
9
(base) ➜  ~ docker run -m 100MB openjdk:8u131-alpine java -XshowSettings:vm -version
VM settings:
Max. Heap Size (Estimated): 443.00M
Ergonomics Machine Class: server
Using VM: OpenJDK 64-Bit Server VM

openjdk version "1.8.0_131"
OpenJDK Runtime Environment (IcedTea 3.4.0) (Alpine 8.131.11-r2)
OpenJDK 64-Bit Server VM (build 25.131-b11, mixed mode)

开启UseCGroupMemoryLimitForHeap

JVM感知到 Docker(Cgroup) 对内存的限制,根据比例分配JVM Max. Heap Size 为 44.50MB。

1
2
3
4
5
6
7
8
9
(base) ➜  ~ docker run -m 100MB openjdk:8u131-alpine java -XX:+UnlockExperimentalVMOptions -XX:+UseCGroupMemoryLimitForHeap -XshowSettings:vm -version
VM settings:
Max. Heap Size (Estimated): 44.50M
Ergonomics Machine Class: server
Using VM: OpenJDK 64-Bit Server VM

openjdk version "1.8.0_131"
OpenJDK Runtime Environment (IcedTea 3.4.0) (Alpine 8.131.11-r2)
OpenJDK 64-Bit Server VM (build 25.131-b11, mixed mode)

8u191版本

从 8u191 版本开始引入了 UseContainerSupport 选项,而且是默认启用的。该功能不仅能像 UseCGroupMemoryLimitForHeap 感知内存的资源限制,还能感知 CPU 的限制。

关闭UseContainerSupport

可以看到 JVM 并未感知到 Docker(Cgroup) 对内存的限制,仍然为JVM Max. Heap Size 分配 (443.00MB) 超过资源限制。

1
2
3
4
5
6
7
8
9
(base) ➜  ~ docker run -m 100MB openjdk:8u191-alpine java -XX:-UseContainerSupport  -XshowSettings:vm -version
VM settings:
Max. Heap Size (Estimated): 443.00M
Ergonomics Machine Class: server
Using VM: OpenJDK 64-Bit Server VM

openjdk version "1.8.0_191"
OpenJDK Runtime Environment (IcedTea 3.10.0) (Alpine 8.191.12-r0)
OpenJDK 64-Bit Server VM (build 25.191-b12, mixed mode)

开启UseContainerSupport (默认)

JVM 默认能感知到 Docker(Cgroup) 对内存的限制,根据比例分配JVM Max. Heap Size 为 48.38MB。

1
2
3
4
5
6
7
8
9
(base) ➜  ~ docker run -m 100MB openjdk:8u191-alpine java -XshowSettings:vm -version
VM settings:
Max. Heap Size (Estimated): 48.38M
Ergonomics Machine Class: server
Using VM: OpenJDK 64-Bit Server VM

openjdk version "1.8.0_191"
OpenJDK Runtime Environment (IcedTea 3.10.0) (Alpine 8.191.12-r0)
OpenJDK 64-Bit Server VM (build 25.191-b12, mixed mode)

结论

  1. 对于 8u191 及以上的版本,JVM已经能够比较好的感知 Docker 通过 CGroup 对容器的资源限制。
  2. 对于 8u131 至 8u191 的版本,需要显式的开启 UseCGroupMemoryLimitForHeap 选项,来让 JVM 感知 Docker 对容器的资源限制。
  3. 对于 8u131 以下的版本,需要用户根据Docker对资源的限制手动配置JVM参数,以防止出现非预期的OOM问题。

Python的hash函数每次执行结果不一样的问题

Posted on 2020-11-18 |

问题描述

近期遇到一个问题Python的 hash() 函数每次得到的哈希值不一样。例如

这会造成应用内部的一个根据 uid 哈希值取模的地方有问题,每次得到的结果不一样。为此我稍微深入的研究了一下这个 hash() 函数。

调查过程

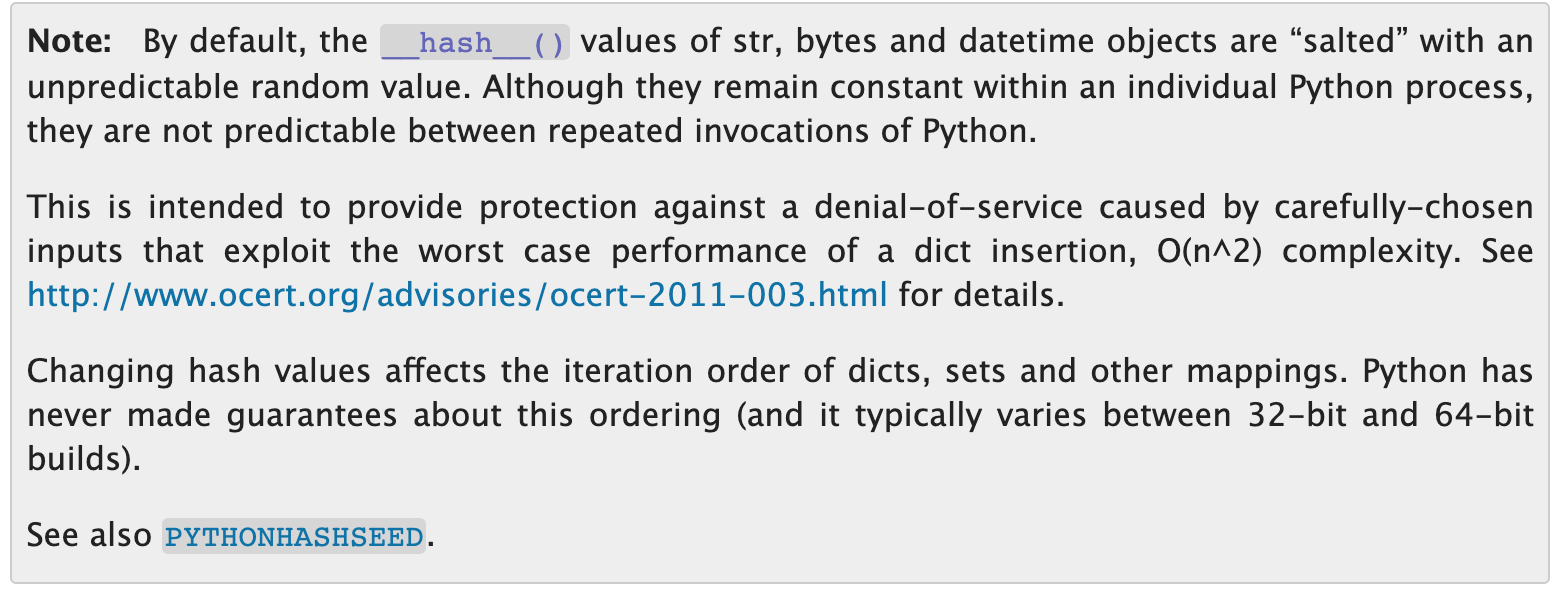
首先查看了一下Python官方文档。hash() 函数的文档并没有提到为什么每次结果不一样。

https://docs.python.org/3.6/library/functions.html#hash

继续看一下内部实现的 hash() 函数。其中有一段提到 hash() 函数在处理 str,bytes 和datetime类型的对象时,会对其加盐,这个值会是一个不可预测的随机值 (an unpredictable random value)。这个值在同一个进程中是一致的,但在不同的进程之间是随机的。并且这个值可以通过 PYTHONHASHSEED 变量来设定。这个实现是从 Python 3.2.3 开始引入的。

https://docs.python.org/3.6/reference/datamodel.html#object.__hash__

验证实验

根据上述的调查结果我们来进行实验验证一下。

同一进程下的hash

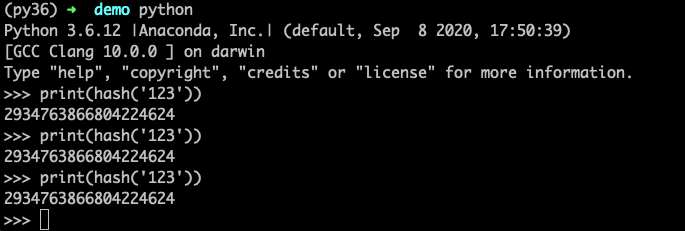
在同一个Python进程下,对同一个字符串 “123” 每次得到的哈希值是一样的。

不同进程下的hash

和开篇描述的问题类似,不同的进程下对同一个字符串 “123” 每次得到的哈希值是不一样的。

设定PYTHONHASHSEED后,不同进程下的hash

设定 PYTHONHASHSEED 为一个固定值1后,不同的进程下对同一个字符串 “123” 每次得到的哈希值是一样的。

解决方法

既然Python的 hash() 函数无法保证不同进程间每次计算的哈希值一致,那我们如果想在不同的进程间得到一致的哈希结果要如何做呢?

答案是用 hashlib。hashlib 的哈希结果可以做到可重现可跨进程的一致性。

https://docs.python.org/3.6/library/hashlib.html

针对上面不同进程下的情况,我们用 hashlib 重复做一次实验。从结果我们可以看到,不同进程中每次的哈希结果是一致的 (只不过返回的类型不像 hash() 函数是int)。

总结

  • 在同一个进程内做简单的哈希比较是可以使用 hash() 函数的,而且哈希的结果是一致的。
  • 在不同进程间如果哈希结果只用与散列,而不是结果比较时 hash() 函数也是可以使用的。
  • 如果用于不同进程间的哈希值比较,不应该使用 hash() 函数,而应该使用hashlib。

Trace MySQL DB Operations in Opentracing System

Posted on 2018-11-28 |

Prerequisite

  • go >= 1.8
  • mysql driver >= 1.4.0 (with Context support)
  • OpenTracing System (e.g. Zipkin/Jaeger)

Examples

Code Examples

1
2
3
4
5
6
7
8
9
10
11
12
13
14
15
16
import (
...
"github.com/go-sql-driver/mysql"
"github.com/luna-duclos/instrumentedsql"
"github.com/luna-duclos/instrumentedsql/opentracing"
...
)

sql.Register("instrumented-mysql",
instrumentedsql.WrapDriver(mysql.MySQLDriver{},
instrumentedsql.WithTracer(opentracing.NewTracer(false)),
instrumentedsql.WithOmitArgs(),
),
)
db, err := sql.Open("instrumented-mysql", dsn)
// db, err := sql.Open("mysql", dsn)

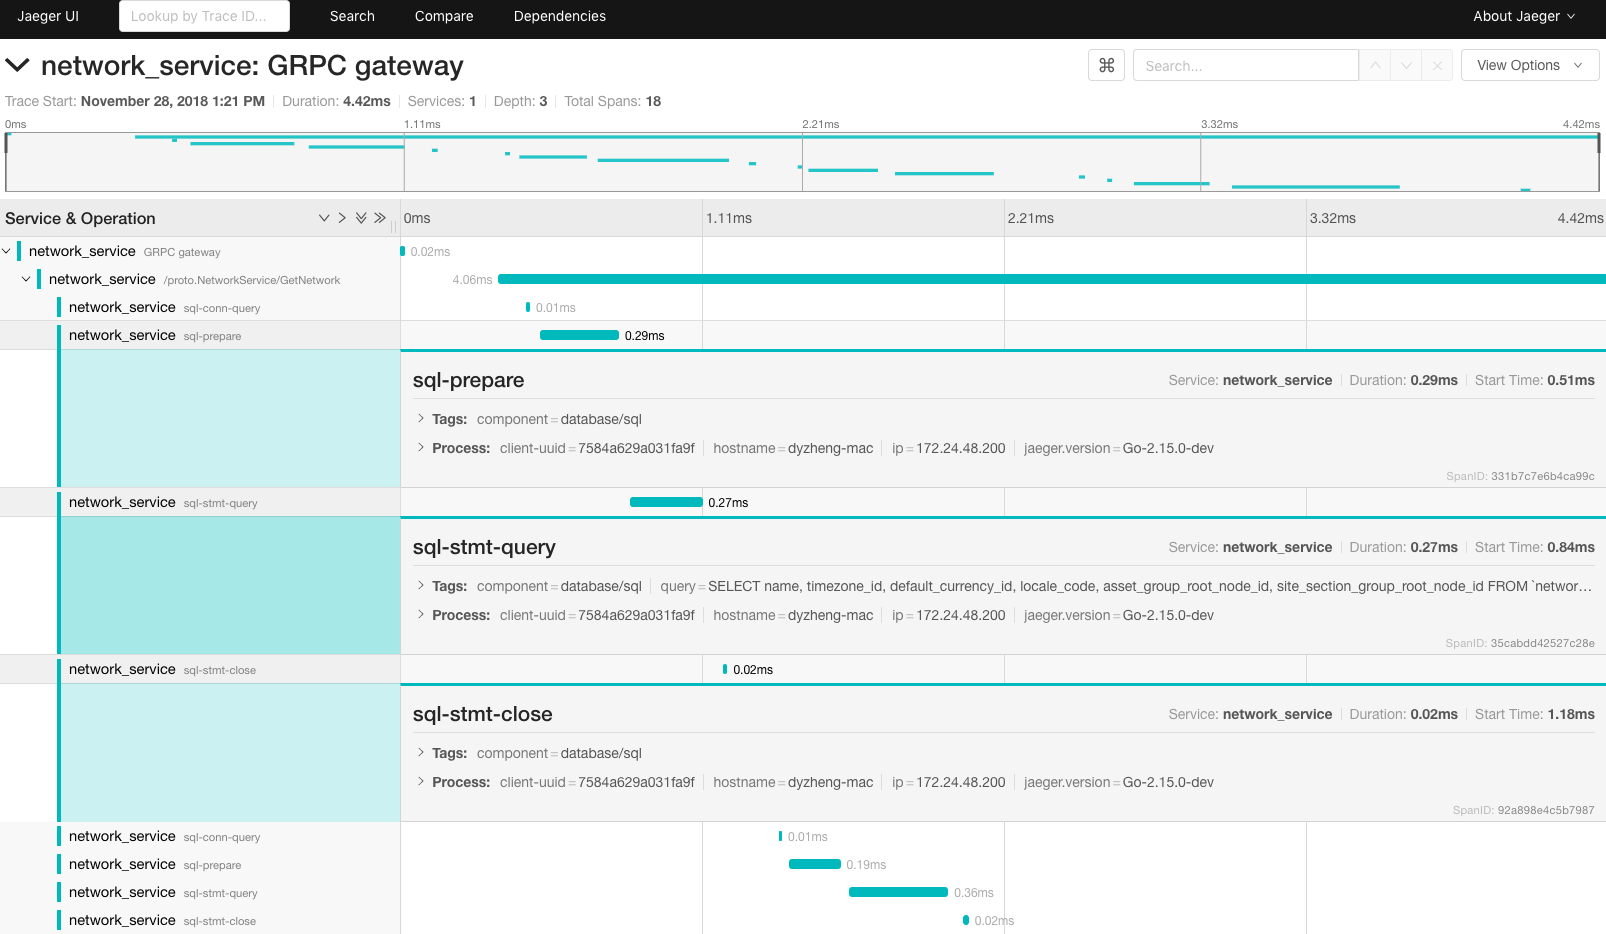
Jaeger Example

Performance Benchmark

Wrapped MySQL driver does not have obvious performance impact.

1
2
3
4
5
6
7
8
9
10
11
goos: darwin
goarch: amd64
pkg: demo/dbtracing

BenchmarkDriverSelect1-8 1000000 1098 ns/op
BenchmarkWrappedDriverSelect1-8 1000000 1108 ns/op
BenchmarkDriverPing-8 1000000 1091 ns/op
BenchmarkWrappedDriverPing-8 1000000 1097 ns/op

PASS
ok demo/dbtracing 4.485s

Reference

  • github.com/golang/go/issues/18080
  • github.com/go-sql-driver/mysql/pull/445
  • github.com/luna-duclos/instrumentedsql
  • opencensus.io

记一次 Golang Contribution

Posted on 2018-04-19 |

源于这个 issue #24767。正好我最近也在用 text/template 这个包来做一些工具(其实主要因为我太弱,这个改动简单……),所以产生了兴趣。

改动很简单,就是有一个 example 和它的描述不相符,补一个符合的 example。但是在代码的提交上花了一些时间。

早就听说 golang 的代码托管在自己的 Gerrit 上,而且提交的流程和一般在 github 上的项目会有些不同。这次终于能自己亲身实践一次。绝大部分步骤都是按照 Contribute上说的来。

准备 Contributor 的前期工作

安装 go-contrib-init 工具

1
2
3
$go get -u golang.org/x/tools/cmd/go-contrib-init
$cd /code/to/edit
$go-contrib-init

配置 Gerrit

  • 登录 googlesource 并生成 password ,这时在页面上会生成一个脚本。
  • 在 shell 里跑这个脚本。
  • 在 Gerrit Review 网站上注册自己的账号。

同意 CLA 协议,自己看吧。

准备开发环境

安装 git-codereview

1
$go get -u golang.org/x/review/git-codereview

配置指令 alias (这一步建议还是配置一下。一开始我没有配,就会导致文档上的指令还要自己脑力转换一下才能跑……)

1
2
3
4
5
6
7
[alias]
change = codereview change
gofmt = codereview gofmt
mail = codereview mail
pending = codereview pending
submit = codereview submit
sync = codereview sync

正式开始修改代码

这部分还可以参考 git-codereview 的文档。

下载go的源代码

1
2
$git clone https://go.googlesource.com/go
$cd go

同步go的主干分支

1
2
$git checkout master
$git sync

终于可以肆意进行你的改动了

  • 提交你的代码
1
2
3
$git add/rm/mv <files>
$git change <branch>
$git commit

这时会默认 $EDITOR 指定的编辑器(默认 vi)来输入你的 commit message。

发送需要review的代码

一条简单的指令

1
$git mail

当然也可以稍微复杂一点,指定 reviewer 和 cc

1
$git mail -r joe@golang.org -cc mabel@example.com,math-nuts@swtch.com

到这里基本上就大功告成了,等待自己的CL被大牛们review吧。

代码审查

由于这个issue Rob Pike之前有过comment,并且之前不一致的example就是他写的。所以他转天很快就在CL上给了comments。

这时,我可有点犯了难。Gerrit 不像 github 上直接在分支上追加 commit 就行了,而是要在 CL 上提交新的 patch set。又马上 google 各种搜索了一通。
用git commit --amend解决了问题。重新提交也很快被Rob Pike merge了。

总结

虽然这个 contribution 没啥技术含量,但是也算体验了一把 golang contribution 的流程,应该会包含在 go1.11 的 release 中。

Prepare Statements in Golang MySQL Driver

Posted on 2018-01-10 |

go-sql-driver/mysql has two kinds of functions Query() and Exec().
I would like to see how Query() works.

Two Modes

Query(query string, args ...interface{}) function has two modes according to whether there are args.

Plaintext Mode

If Query(query) is called without args, I call it ‘Plantext Mode’.

In this mode, driver does NOT do anything on the query string, and just send it directly to MySQL server.

Interpolation Mode

If there are some placeholders in query string (i.e. ? in MySQL) and some args are passed in to interpolate, I call it ‘Interpolation Mode’.

In this mode, driver actually does 3 actions

  • Prepare a statement.

  • Execute the prepared statement using given args.

  • Close the prepared statement.

That is exactly the slogan of prepared statement Prepare Once, Execute Many.

Difference

SQL Injection

Assume you have a table named prepare

id name
1 name1
2 name2
3 name3

A SQL can be run select id, name from prepare where id = 1; on this table.

It returns

id name
1 name1

Everything is fine. Ok, let’s have a look at how to implement it in previous two modes.

  • Plaintext Mode
1
2
3
func plaintextQuery(db *sql.DB, id string) *sql.Row {
return db.Query("select id, name from prepare where id = " + id + ";")
}
  • Interpolation Mode
1
2
3
func interpolationQuery(db *sql.DB, id string) *sql.Row {
return db.Query("select id, name from prepare where id = ?;", id)
}

When you pass “1” as id, everything is expected. However, is it really OK? Let’s try a SQL injection case, pass “1 or 1 = 1” as id.

Oops, interpolationQuery() still returns the same, but plaintextQuery() returns all data in the table which means violated SQL has been injected.

Performance

I make up a simple insert SQL through the two modes.

1
2
3
4
5
Inserts Number:  100000
Plaintext Mode
Duration 16.058662357s
Interpolation Mode
Duration 24.076297264s

It means that Plaintext Mode has a better performance than Interpolation Mode.
It is reasonable because Interpolation Mode has to do 3 network communications per Query() or Exec().

Conclusion

  • Interpolation Mode can be used to avoid most of SQL injection, which is an important benifit. Therefore, it is highly recommended to use it especially for user input parameters may cause SQL injection.

  • Plaintext Mode has a better performance to some extent. However, there still some methods to speed up Interpolation Mode, I will talk about it later.

Reference

  • Using Prepared Statements
  • Golang Mysql笔记(三)— Prepared剖析

My First Blog

Posted on 2017-09-06 |

Hello everyone!

This is my first blog in this site.
I am trying to post my blog using hexo, which is amazing.

Zheng Dayu

ceshihao's blog

6 posts
10 tags
GitHub Linkedin E-Mail StackOverflow
© 2021 Zheng Dayu
Powered by Hexo v4.2.1
|
Theme – NexT.Muse v6.5.0